Showing posts with label Recipes. Show all posts

Friday, October 5, 2012

Foodie Friday: Oatmeal Cookies

With an anniversary dedication and being so busy last Friday, it's been a few weeks since we last had a Foodie Friday post. Fear not, though, I have a great treat to share with y'all today! Nothing will ever compare to my love for a Little Debbie Oatmeal Creme Pie, but when looking for something on the healthier side, these cookies do the trick!


**********

Healthy Banana Oatmeal Cookies

Prep Time: 10 minutes
Cook Time: 15 minutes

Yields: 12-15 cookies

Ingredients:


  • 1/2 cup whole wheat flour
  • 1 cup rolled oats
  • 1/4 cup raw walnut pieces
  • 1/4 cup raw almond slivers
  • 1/2 tsp. baking powder
  • 1/4 tsp. cinnamon
  • 1/2 tsp. vanilla extract
  • 1/4 cup butter, melted
  • 1/4 cup pure maple syrup
  • 1/4 cup skim milk
  • 1 banana
  • 1/2 cup dark chocolate chips


Directions:

Combine and stir all ingredients together, until mixed well. Roll into ball in hand. (yes, this will be a sticky mess) and flatten on greased cookie sheet. Bake for 15 minutes at 350 degrees. Let cool slightly before removing from pan. Enjoy!


**********


Friday, September 28, 2012

Foodie Friday: Chocolate Chip Reeses Blondies

If you're in the market for a big, fluffy chocolate chip cookie bar, you're in luck! I made these blondies a while back before I really knew what blondies were. To be honest, I still don't really know. I'm chalking them up to something like a chocolate chip cookie... bar. Whatever they may be, they surely are delicious!

**********

Chocolate Chip Reeses Blondies

Prep Time: 15 minutes
Cook Time: 25 minutes

Yields: 16-24 servings [depending on what size you cut them]

Ingredients:


  • 1/2 cup melted butter
  • 1 cup tightly packed brown sugar
  • 1 large egg, lightly beaten
  • 1 tsp. vanilla
  • 1/2 tsp. baking powder
  • 1/8 tsp. baking soda
  • Pinch of salt
  • 1 cup all purpose flour
  • 1/4 cup chocolate chips
  • 1/4 cup Reeses peanut butter chips


Directions:

Whisk together melted butter and sugar. Add egg and vanilla, and whisk until combined. Mix in remaining ingredients and whisk thoroughly. Pour batter into 9x11 glass pan and bake for 25 minutes at 350 degrees. Cool and enjoy!

**********


Friday, September 7, 2012

Foodie Friday: Cheesy Potatoes

Some may call them scalloped, some may call them cheesy taters... I call 'em freaking fantastic! This recipe is one that's been passed down from my Mema, to my mom, and now to me. To be honest, I'm not sure if this is even the exact way they make them, but it's how I remember it and quite frankly, I make them pretty dang good.

PS- I keep it simple. There really is no way to screw these up.

**********

Cheesy Potatoes

Prep Time: 40 minutes
Cook Time: 45 minutes

Yields: 10 servings

Ingredients: 

  • 2.5 pounds gold potatoes
  • 1 bag (2.5 cups) shredded Colby Jack cheese (or whatever kind you prefer)
  • 1 cup milk
  • 4 Tablespoons butter
  • Salt & Pepper to taste


Directions:

Peel and cut potatoes into 1 inch cubes. Par-boil potatoes until a knife can be easily inserted through potato without much force. Layer potatoes, cheese, and salt and pepper into a 9x9 dish. Cube butter into single tablespoon portions, and shove each cube into the potatoes.Pour milk over the potatoes. Cook for 45 minutes at 400 degrees. Enjoy!

**********


Friday, August 31, 2012

Foodie Friday: Cream Cheese Buffalo Chicken Taquitos

I found a recipe for something along the lines of cream cheese & buffalo bacon and chicken taquitos. Um... can you say yum? I had high hopes for making these little boogers but in the end decided that I wanted to wing it and make a super simple version of them. I wont even reference where I found the inspiration because a) I can't remember and b) they are nothing like the recipe. That being said, these bad boys were stinkin' amazing (and spicy!) and I definitely plan to make them again.

**********

Cream Cheese Buffalo Chicken Taquitos

Prep Time: 15 minutes
Cook Time: 15 minutes

Yields: 4 servings

Ingredients:
  • 2 pounds chicken breast, shredded
  • 1/3 cup Frank's Hot Buffalo sauce
  • 8 oz. cream cheese, softened
  • Salt & pepper to taste
  • 8 tortillas (I used flour)
  • Oil for frying (I used vegetable)

Directions:

If you don't use canned chicken, you can do what I did and either boil, or throw your chicken in the crock pot for a few hours and quickly shred with a fork. Combine shredded chicken, buffalo sauce, cream cheese, and s&p into a large bowl and mix together. Spoon mixture into tortillas and wrap, securing with a toothpick. Meanwhile, heat your oil over medium heat. Once hot enough, drop each taquito into oil and fry, turning for an even cook (about 45 seconds-1 minute). Lay on a paper towel to soak excess oil and cool. Serve with desired toppings, dipping sauces and enjoy!

**********


Friday, August 24, 2012

Foodie Friday: Crab & Potato Soup

Over the rainy weekend all I could think about was how excited I was for fall and all of the warm, comforting meals that come along with it. Being the impatient person that I am, when the craving for a warm, heavy soup came along, I had to have it. Turning to my pantry, I pulled out a few ingredients and threw them into a pot. Out of no where-- poof! bam! thank you, ma'am! came this delicious hearty soup that will now be a staple in our household for years to come.

**********

Crab & Potato Soup

Prep Time: None
Cook Time: 5 minutes

Yields: 2 servings

Ingredients:
  • 2 cans Campbell's Cream of Potato Soup
  • 1/2 can diced potatoes
  • 1 can shredded crab meat (drained)
  • 1 cup water
  • Salt and pepper to taste

Directions:

Throw all ingredients into a pot, stir, and cook over medium heat until warm. Enjoy!

**********


Friday, August 17, 2012

Foodie Friday: Crockpot Chocolate Cake

Hooray for the second installment of Foodie Friday! I told you all it'd make a return... eventually. A few weeks ago I was browsing none other than ol' trusty Pinterest and came across a recipe for what was pinned as "the most moist cake ever". It's no secret that I'm a cake/cupcake lover, and am all about delicious, moist cake. Bring it on!

I slightly tweaked this recipe and it came out so, so, so good. As for the look of it... we will deem this 'The Cake That Looked Like Booty but Tasted Amazeballs" or "The Ugliest Cake I Ever Ate".

My recommendations are to wait until the cake cools completely before trying to dump it from the crockpot. Obviously I was much too excited about the results of a freakin' cake from a crockpot (!!!!) and couldn't stand to wait. I would also wait to eat it until it cools as well. While it was absolutely delicious piping hot with melted frosting oozing down the slice, I had another piece last night and it was so much better at room temperature.

Normally I am all about completely sealing a cake in tupperware to keep it fresh, but with this cake I just wrapped foil around the plate it was sitting on and left it out. Two days later and it was just as moist as the first day.

Because of the texture of this cake, I think it would be absolutely perfect to use a white cake base and make your own sponge/Angel Food cake with. I think I've got a new idea!

Now for the moment you have all been waiting for...

**********

Crockpot Chocolate Cake

(Adapted from Mom's With Crockpots)

Prep Time: 5 minutes
Cook Time: 2-4 hours

Yields: 24 servings (or 5 in our household)

Ingredients:

  • 1 box chocolate cake mix
  • 1 package instant chocolate pudding mix (small box)
  • 12 ounces fat free plain Greek yogurt (I love Fage brand)
  • 4 eggs
  • 3/4 cup unsweetened apple sauce
  • 1 cup water

Directions:

Spray crockpot with non-stick cooking spray. Mix all ingredients together and pour into crockpot. Cook on low for 6-8 hours or high for 2-4 hours. (Mine only took 2.5 hours, but my crockpot's 'high' is really hot!)

Enjoy!

**********


**********

Tuesday, March 6, 2012

Tzatziki Sauce

Well I sure am pooed after this morning's workout! Today I began Tina's boot camp. Lately I have been feeling very bored at the gym and have been poking around the www for weeks now looking for new moves to incorporate into my workouts. Luckily I heard about this camp at the last minute and signed myself up! Today was a cardio day and I definitely felt like I pushed myself more than I have been lately. I sure am hoping to have a hot bod this summer (or at least one that I am somewhat proud of).

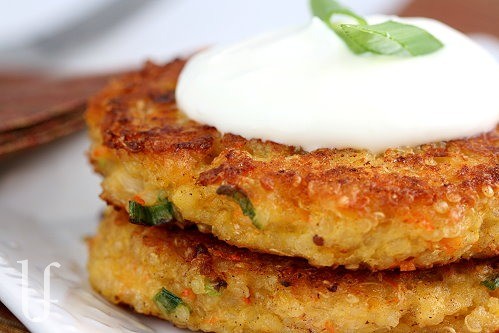
Last week I posted a recipe for some super-duper nutritious and delicious quinoa burgers. I also mentioned a sauce that I would be sharing soon enough, that only makes these little babies even tastier!

I'm really not sure what tzaiki sauce is typically eaten with... but it seems like it would be tasty on pretty much anything that you'd top with sour cream, yogurt, etc. By now, we all know I like to keep things pretty real around these parts, so I won't lie when I say I was apprehensive to try this stuff at first. I can't even spell the darn word, why would I want to try the stuff? But after a tiny dip of the finger, I was sold. If you like sour cream, you will enjoy this recipe!

**********

Tzatziki Sauce

(Adapted from Eating Well, Living Thin)

Prep Time: 15 - 20 minutes
Cook Time: None
Chill Time: Recommended 2 hours

Yields: About 1 cup

Ingredients:

  • 3/4 cup thick plain Greek-style yogurt
  • 3 tablespoons light sour cream
  • 1/2 cucumber, peeled, seeded and grated – squeezed of excess water
  • 1/4 teaspoon garlic powder
  • 1/2 teaspoon sugar
  • 1 teaspoon dried dill weed
  • Kosher salt and black pepper to taste

Directions:

In a small mixing bowl blend together the yogurt, sour cream, grated cucumber, garlic powder, sugar, and dill weed. Season with salt and pepper to taste. Chill.

Enjoy!

**********

Thursday, March 1, 2012

Quinoa Burgers

You may have already seen these babies running around on Pinterest, but I first found out about them through my aunt. I wasn't expecting to be a fan of them, but they really are delish and have a great flavor and texture! Oh yeah, and it doesn't hurt that they are EXTREMELY good for you. Summer bodies, here we come!

**********

Quinoa Burgers


Prep Time: 30 minutes (this includes time for cooking the quinoa)
Cook Time: 8 minutes (4 on each side)

Yields: Approximately 10 burgers

Ingredients:

  • 2 rounded cups cooked quinoa
  • 3/4 cup shredded mozzarella cheese
  • 1/2 cup low-fat cottage cheese
  • 1 cup shredded zucchini, squeezed
  • 3 eggs
  • 3 tablespoons all purpose flour
  • 2 green onions, including white parts
  • 1/2 teaspoon or sugar
  • 1/4 teaspoon black pepper
  • 1/4 teaspoon ground cumin
  • 1/8 teaspoon salt
  • 1/8 teaspoon garlic powder
  • Olive oil for frying

Directions:

In a large bowl combine the cooked quinoa, mozz. cheese, cottage cheese, carrot, eggs, flour, green onions, sugar, pepper, cumin, salt, and garlic powder. Heat a frying pan and a couple teaspoons olive oil over medium-low heat.  Mixture will be slightly sticky, so using a 1/4 cup measuring cup, drop mixture into pan and lightly flatten to 1/2 inch thick.  Fry until golden-brown, about 4 minutes on each side.

Enjoy!

**********


What is the sauce on top of the burgers, you ask? Stay tuned and I'll share it with you guys soon!

Monday, February 13, 2012

White Chicken Enchiladas

What's not to love? Sour Cream, cheese, chicken, and tortillas. I don't think it can get much better than that. Oh yeah, there's cream, too. I made these enchiladas a while back after seeing them on TPW. I think that I even posted about them on my old blog, but I definitely feel the need to share them again.

**********

White Chicken Enchiladas

(Adapted from The Pioneer Woman)

Prep Time: 45 minutes
Cook Time: 30 minutes

Yields: 6 servings

Ingredients:
  • 2-½ cups cooked, shredded Chicken
  • 2 cups chicken broth
  • 1 T canola oil
  • 10 flour tortillas
  • 3- 4 oz cans green chilies, diced
  • 1 t paprika
  • 1/2 cup heavy cream
  • 2 T butter
  • 2 T flour
  • 1 cup sour cream
  • 2-½ cups monterey jack cheese, grated
  • salt and pepper, to taste
Directions:

Heat 1 tablespoon canola oil in skillet over medium heat. Add chicken, half of the green chilies, and 1/2 teaspoon paprika. Stir together. Add 1/2 cup chicken broth and stir. Add cream and stir, allowing mixture to bubble and get hot. Turn off heat and set aside.
 
In a separate large skillet, melt butter and sprinkle in flour. Whisk together and cook over medium heat for one minute. Pour in 1 1/2 cups chicken broth. Whisk together and cook for another minute or two. Stir in the other half of the chilies. Reduce heat, then stir in sour cream. Add 1 1/2 cups grated cheese and stir to melt. Add 1/2 teaspoon paprika. Check seasoning and add salt and pepper as needed.
 
To assemble, spoon chicken mixture on top of tortillas, one by one. Top with plenty of cheese and roll up. Place seam side down in a 9 x 13 casserole dish.
 
Pour sour cream sauce all over the top of the tortillas. Top with extra cheese if you’d like, then bake at 350 degrees for 30 minutes.

Enjoy!

**********


Thursday, January 12, 2012

Mexican Wedding Cookies

...and you don't even have to be Mexican to make them!

After a conversation with a couple of our friends over the weekend, I have had cookies on the brain ever since. Usually, I try not to buy much "junk" food at the grocery store, but this week I came home with a package of these babies:


Of course, we poured ourselves a couple glasses of cookie-dunking milk, and dug right in! So good.

Anyway, all this cookie talk got me thinking about some yummy little devils I made over the summer, and am now kicking myself for not making them for the holidays!

The first time I tried MWC were at the BF's parent's house. Damn, were those things good. I knew I had to find a way to recreate them. And that, I did.

**********

Mexican Wedding Cookies

(Adapted from Sweet Tooth Sweet Life)

Prep Time: 20 minutes
Cook Time: 40 minutes

Yeilds: 24 small, or 16 large cookies

Ingredients:

  • 1 cup salted butter, softened
  • 1/2 cup confectioner's sugar (extra for coating)
  • 1 3/4 cup all purpose flour
  • 1 tsp. vanilla
  • 3/4 cup finely chopped walnuts (I suggest using pecans)

Directions:

Preheat oven to 275*. Line cookie sheet with parchment (wax) paper.

Using an electric mixer, mix butter and sugar at low speed until smooth, stopping to scrape sides of bowl. Mix in the vanilla. Continuing at a low speed, gradually at the flour, until thoroughly mixed. Stir in nuts with a spatula.

With floured hands, shape glob of dough into circle form. Continue to dust hands with flour as shaping more cookies. Place cookies onto parchment paper and cook. When cool enough to handle, but still warm, roll in extra confectioner's sugar.

Enjoy!

**********


I've got my next cookie-ish idea in mind... but I need a box of something special! Anyone in the Austin area know any Girl Scouts??

Thursday, January 5, 2012

Crock Pot Chicken Pot Pie

I have recently fallen in love with my crock pot. The convenience of being able to throw pretty much anything into a pot, turn it on, and come home from work to a hot meal is amazing!

I put a search out for a chicken pot pie recipe, and a lot of the recipes I ended up finding, basically said, "make the innards of the pie and serve with biscuits, rolls, etc." Girl, please. We all know the best part of pot pie is the soggy yet still crunchy crust... right? Well, to me that is the best part! In the end I just pulled bits and pieces that sounded appealing from about 3 different recipes and made my own version!

**********

Crock Pot Chicken Pot Pie

(Adapted from random online recipes)

Prep Time: 10 minutes
Cook Time: 6 hours 13 minutes

Yeilds: 4 servings (in my household)


Ingredients:
  • 2 large chicken breasts, chopped
  • 2 cans cream of chicken soup
  • 1 cup milk
  • 4-5 medium potatoes
  • 1 small bag frozen veggies
  • seasoning to taste (I used season salt and pepper)
  • 1 package crescent rolls

Directions: 

Chop chicken and potatoes into 1/2 in. chunks. Pour all ingredients EXCLUDING milk and crescents into crock pot. Season to your liking. Cook on low for 6 hours. Stir in milk. Transfer everything from crock pot to a 9x13 in. pan, and lay crescents flat over the top. Bake as directed on package. Typically anywhere from 350*-375* around 11-14 minutes.

Enjoy! This recipe can be altered to add or subtract anything that you think would be tasty! The end result is not the prettiest of all foods, but it sure is yummy!

**********


Tuesday, December 27, 2011

Oreo Pee

Sounds yummy, eh? Well, it is... I promise. Just pay attention, mmk?

I really do have the yummiest tastiest deliciousnessiest (say whaa?) recipe for you guys. I found this recipe somewhere online years ago when I was a teenager and it has become a holiday staple with my family. If there is no oreopee, Thanksgiving/Christmas is ruined (not really but close enough).

Before I give you all the key to gates of Heaven, you must know that this stuff is not really called oreopee. The real name is Oreo Pie, and throughout the years, it has somehow conformed into pee. Why? Because my family is really mature. Duh.

Now, enough with all the talking, let's get to the point:

**********

Oreo Pie

(Adapted from somewhere on this website many moons ago)

Prep Time: 15 minutes
Cook Time: 35 minutes
Chill Time: 2 hours

Yeilds: 10-12 servings (5 servings in my family, no joke)

Ingredients:
  • Box of brownie mix (& ingredients listed on box)
  • Box of JELLO oreo pudding mix (& ingredients listed on box)
  • 18 oz. tub Cool Whip
  • Oreo Cookies (as few or as many as you want)
Directions

Prepare and bake brownies as directed on package. Cool completely. Scoop out center of brownie with spoon, leaving a 1-inch crust around the edges and a thin layer of brownie on the bottom. SAVE the removed brownie pieces. Prepare pudding mix as directed on package. Stir in almost 3/4 of Cool Whip and almost all remaining brownie pieces. Spoon mixture into brownie crust; top with remaining Cool Whip, brownie pieces and crumbled Oreo cookies. Refrigerate for at least 2 hours. Store leftover dessert in refrigerator.

Enjoy, and try not to eat the entire pan in one sitting. Not like I've ever done that or anything, it's just some advice.

**********